11 Nov 2014 · By Julian Connor
For the last month, the web team has been diligently working on porting our webview code from one repository to another. Through this long and tedious process we've learned a lot about the code we used to write and the code we now write. The striking contrast reminds us that sustained piecemeal progress gives large code bases the opportunity to bloom.
In this blog post, I will go through two valuable lessons we learned:
- You can't put toothpaste back in the tube.
- Do one thing at a time.
You can't put toothpaste back in the tube
Imagine you are a developer who is blazing his or her own trail through the unknown; in this case, an unfamiliar repository. Wouldn't you repurpose patterns and conventions in order to complete your task?
Of course you would. All engineers are guilty of copying code every now and then. Despite being efficient, code copying has the potential to propagate anti-patterns throughout your codebase.
Here's an example of how a Backbone Model anti-pattern got out of the tube:
Backbone exposes a get method on its models. This method accesses an object on the model instance and returns the value if found, e.g., model.get('foo'). Unfortunately, it's also possible to access the attributes directly on the model like so model.attributes.foo. Invoking a get method is ideal because it allows for functionality to be tied into accessing model data. E.g., one may need to increment a counter every time a model attribute is accessed.
The pattern of directly accessing the model attributes was used once and began organically propagating itself. Once anti-patterns are out of the tube they become increasingly difficult to subdue as their footprint greatens over time.
How to avoid needing to put toothpaste back in its tube
Define and document a set of interactions for the code base:
- How do we run tests? Create builds? Install dependencies? Start the dev server?
- Is there a style guide? How about a linting process?
- etc...
Additionally, think long and hard about the foundational aspects of your repository:
Are we happy with the overhead of adding new files to the repo? (E.g., boilerplate, dependency management, pathing, etc..)
Is the code architecture sustainable? I.e., Do we foresee these patterns scaling well?
Foundations dictate the resilience of their burdens.
Only refactor one thing at a time
It's easy to become distracted when interacting with large amounts of legacy code. In the majority of cases, flaws and anti-patterns will emerge, potentially leading to lengthy spirals of refactoring.
Before getting started, it's important to clearly define the goal of the refactoring and stay within its bounds. Two rounds of well defined refactorings can be completed in a much more steadfast manner than one round of wavering changes and improvements.
Conclusion
Code quality is a function of its development environment. Defining a strong safety net, style guides, and best practices will lead to self-curation and the propagation of code that the team loves.
03 Nov 2014 · By Cassidy Williams and Amanda Li
This is the first in a series of Venmo Developer Spotlights, where you can get insights on what life at Venmo is really like. If these posts tickle your fancy, head over to our job board and join us!

Amanda is an awesome backend engineer at Venmo. She has worked in a wide range of places, including government, investment banks, and startups. She graduated from Cornell University with a degree in Information Science. In her spare time, she loves to dragonboat (ask her what that is), cook, eat, and drink wine - preferably in that order.
How long have you been with Venmo? What do you work on?
I've been at Venmo for over a year and have spent that time working on the Data & Internal Tools team. They're like my family, but just the incredibly funny ones. At Venmo, I develop applications used by our internal teams to help them do great things like detect fraud and assist our users.
What is your favorite programming language?
My current favorite programming language is Python. Ruby is a close second.
What do you like to do outside of work?
Outside of work, I like to stay active. Whether it be paddling on the water, playing dodgeball with coworkers, or hitting the gym, it feels good to work up a sweat.
Are you working on any side projects right now?
My side projects include building websites for non-profit organizations, one of which is a Breast Cancer Survivor Dragonboat Team. They're all written in Ruby on Rails, using Bootstrap themes, and hosted on Heroku. Nothing flashy, just simple and straightforward.
What is a fun fact about you that you don’t usually get to talk about?
I recently made the preliminary roster for the 2015 USDBF Team USA Premier Women's Dragonboat Team. It's the equivalent of qualifying for the US Olympic Team, if Dragonboating was an Olympic sport.
What advice do you have for aspiring developers?
My advice to aspiring developers is to prepare yourself on how to deal with failure. There will be many times where you will hit a proverbial wall in your learning process. Maybe it's a concept you just can't figure out, or your code won't compile. Life. Will. Suck. You have to be stubborn and believe that you can figure it out - it's just a matter of time. Step back, look at the bigger picture, reach out to others for advice, or try a completely new approach. You've got this.
Got more questions? Email us at blog@venmo.com!
06 Oct 2014 · By Cassidy Williams
Every quarter, Venmo does something that I think is pretty darn great: we have Hack Week!
For an entire week, we can work on pretty much anything related to Venmo. Some people work on new Venmo features, some people work with new people, some work on making new apps… it’s a free for all. And it’s awesome.
One of the interesting things that everyone tries is working on support cases. As you can imagine, Venmo has a lot of questions coming in, both about the app and how to do certain tasks! So, everyone who participates in Hack Week spends a half day helping our support team help our users. At first it was a bit daunting, but after a while it was kind of fun working through the problems.
We don’t have to just work on technical projects. Some people work on copy for our website, some mock up new designs, and one of our engineers even threw an improv-teaching event for anyone who wanted to join in! A bunch of us took over a conference room and had a blast playing games and laughing with each other. My favorite game had us all acting out superheroes. I was Batman.
Some really cool projects have come out of Hack Week in the past. Some people have built their own laptop stands, a couple made a street light that reacts to our tests, we’ve had apps that integrate our APIs with another service, and we've had whole new features of Venmo that are now in production (and will be soon!). This time around, I built a Venmo Snapchat dashboard with Django that I’m pretty proud of.
So, what are the prizes for these fabulous projects? Well, because we’re classy folk who love to eat, the best overall hack gets a fancy dinner with a Venmo employee. For the other prizes, the hackers get to choose snacks for the office (which is a pretty big deal, trust me).
Honestly though, everyone’s a winner at Hack Week. Our employees get to work on projects they don’t normally get to try, and they work with people they don’t normally get to work with. Plus our users get some cool features that they wouldn’t normally see until later. Boo yah.
28 Aug 2014 · By Annie Corbett and JT Glaze
Venmo’s engineers and designers are constantly tweaking and upgrading the Venmo app. They are always working on new designs and new features to make paying friends more enjoyable, intuitive, and engaging. As our user base grows, so does the amount and variety of data we have access to, which we can use to inform how we improve the product.
We recently started using Looker at Venmo, and this has made it much easier for PMs, engineers, and designers to leverage this data and make informed product decisions.
The engineering team’s first use of Looker occurred during a recent app release and design change.
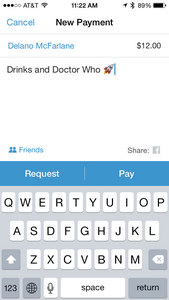
Up until recently, the compose screen on the Venmo iOS app had the design seen below. A user would enter her friend’s name, payment amount, and payment description, and then would select whether she wanted to pay or charge.
Once the user selected pay or charge, a "Send Payment" or "Send Charge" confirmation button was presented. This binary option forced a user to choose and confirm their action.
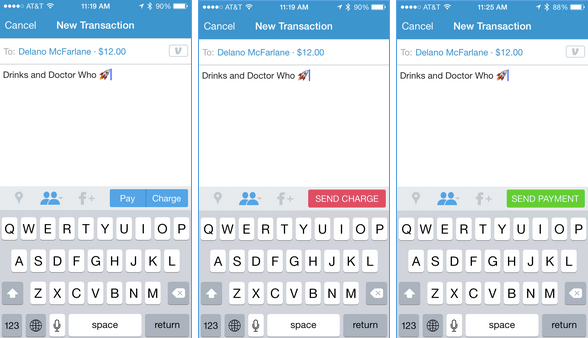
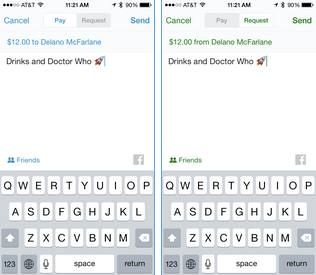
On June 4, 2014, Venmo released iOS version 6.0. In this release, the design and product team decided to eliminate the binary option, and each Venmo transaction defaulted to pay. Before hitting send, the user could toggle back and forth at the top of the screen to choose between pay or charge.
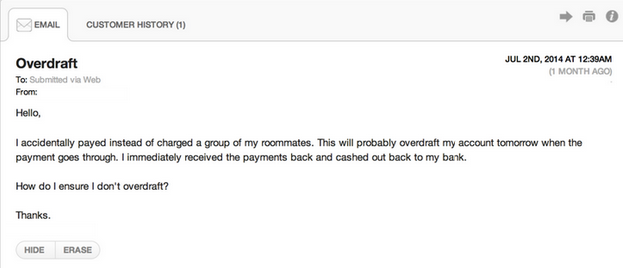
Venmo’s support team closely monitors cases from our users to see the types of issues they are having. When the support team notices an influx in a certain category of case, or a new, unique problem that starts to arise, they reach out to the Venmo product team to investigate.
In the case of the updated iOS release, v6.0, the support team saw a sudden influx in users writing in, asking to reverse their payments because they had accidentally paid when they meant to charge.
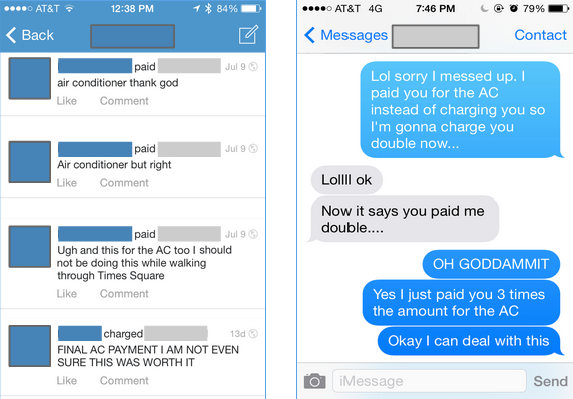
In the Venmo feed, we were also seeing that users were paying their friends, then realizing their mistakes and charging their friends for double the initial amount. This person actually made the mistake three times in a row…
The support team notified the product team to investigate the problem. It was clear some users were accidentally paying instead of charging, but it wasn’t clear how widespread the problem was and whether it was worth prioritizing a fix.
The product team then reached out to the data team, to do deeper analysis into the problem and see how many users were actually making the mistake. Initially, the data team did not use Looker; whenever we were asked for data, we would write a custom script, print out a bunch of data to excel, do a bunch of manual calculations, and then repeat this process whenever the product team wanted to extend the timeframe.
 The data team decided to build this analysis using Looker, our new business intelligence tool. Looker’s browser-based platform makes it easy for us to discover what’s going on in our business and how people are using our product. So using Looker, we created a table with custom dimensions and measures to identify these payments with just one boolean flag. We tracked these errors in payments by flagging users that make a payment and then charge the same user two times the original amount, within two days of the initial payment (a common behavior we noticed for users who made the pay/charge mistake).

We first looked at the percentage of charges that are mixups across payment mediums (iOS, Android, and web). We found that when version 6.0 was released, the percentage of mistaken charges on iOS increased from less than .5% to over 6%, which suggested that the iOS v6.0 release was somehow to blame.
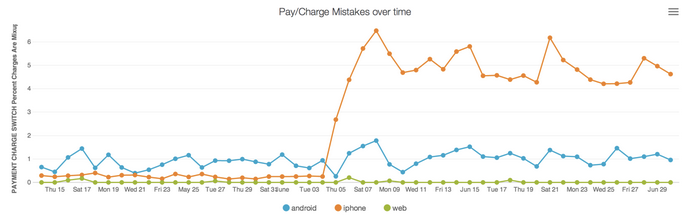
x-axis shows the day the charge was made, y-axis shows #of charge mistakes/# of charges made on that day
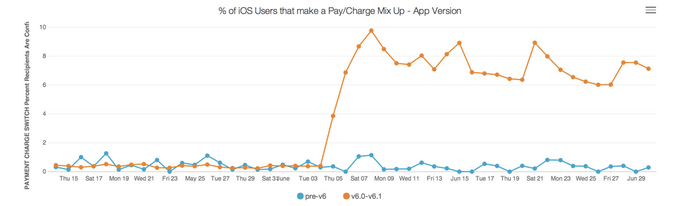
So, we dug a little deeper and looked at the different app versions used in charge mixups, pre version 6.0 vs. version 6.0. Users that didn’t upgrade to version 6.0 stayed constant; however, users that upgraded saw a surge in charge mixups.
After reviewing the data with the engineering and design teams, we knew that version 6.0 was causing the problem and that we had to implement a solution. On July 21, 2014, the product team released version 6.2 for iOS, reintroducing the binary payment option, with the pay and request buttons at the bottom of the payment screen.
Since releasing version 6.2, we have been monitoring the pay/charge mixups across app versions; pre version 6, version 6.0 - 6.1, and version 6.2. While mistakes are not back to the pre-version 6.0 numbers, updating the pay/charge buttons decreased errors by more than half.
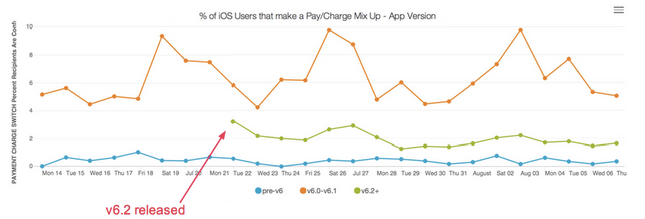
As of August 8th, 43% of iOS users had upgraded to v6.2, and our support team has continued to see a decrease in payment/charge confusion cases as the new version’s adoption increases.
Looker made this analysis much easier for the data, product, and engineering teams. Once the product and engineering teams sent the original data request, everything they needed was easily accessible in their customized Looker dashboard, giving them all the data they needed right at their fingertips.
We’re super excited to continue using Looker to help us make data-driven product decisions at Venmo!
15 Aug 2014 · By Matthew Gotteiner
The Venmo Android App Switch SDK enables anyone to easily add person-to-person payments to an app. After adding the required sample files to your project, all that's left is to add a few input fields and fire off a request. To demonstrate how simple it is to integrate the App Switch SDK, let's walk through a sample app that allows a user to send a Venmo payment to a contact by searching for a name or phone number. Integrating contacts into your app is not a requirement to use our SDK, but it is a common use case so I decided to go over that process here. Download the source code for the complete app here: https://github.com/mgottein/app-switch-demo
This tutorial uses an AutoCompleteTextView widget to search a user's contact list. AutoCompleteTextView is similar to EditText, except that it provides a list of suggestions to the user based on what they are typing and allows the user to click on one to complete their entry.
In order for AutocompleteTextView to know what suggestions to provide to the user, we must provide it a ListAdapter that implements Filterable. The ListAdapter allows the AutocompleteTextView to access your suggestions, and implementing Filterable filters the list by what the user is currently typing. We'll be using the SimpleCursorAdapter ListAdapter.
First, retrieve a user's contact information by adding the read contacts permission to AndroidManifest.xml. If we don't add this permission, we will be prevented from reading contact info. Add this line under the manifest tag:
<uses-permission android:name="android.permission.READ_CONTACTS" />
Contact information in Android is exposed by a ContentProvider, a class that allows applications to access content. The contact ContentProvider allows us to look up the contact information via a SQLite query. The contact information will be inside a Cursor, a class that encapsulates the query results. Since our data is inside a Cursor, we don't have to implement our own ListAdapter from scratch and can instead use a SimpleCursorAdapter which handles much of the adapter boilerplate code for us.
We can access the contact ContentProvider by using a ContentResolver. ContentResolver provides a query method that looks like a SQLite query. Let's take a look at its definition:
ContentResolver.query(Uri uri, String[] projection, String selection, String[] selectionArgs, String sortOrder)
uri allows the ContentResolver to identify a ContentProvider that will handle this query. We will be using this parameter to address our query to the contacts ContentProviderprojection is a list of columns we want the query to returnselection is a list of predicates that allow us to filter out unwanted resultsselectionArgs is a list of arguments to our WHERE clause. Question marks will be replaced with the selection args in the order they appear (first question mark maps to selectionArgs[0], …)sortOrder specifies how the results should be ordered in the cursor
This generates a SQLite query that will look something like this:
SELECT <projection> FROM <uri> WHERE <selection> ORDER BY <sortOrder>
Making the Projection Statement
There are many columns in the Android Contact entity, but we only need a few of them here. We care about Contacts.DISPLAY_NAME_PRIMARY, Phone.NUMBER, and Data._ID.
We can now set up our projection:
private static final String[] PROJECTION = new String[]{
    Data._ID,
    Contacts.DISPLAY_NAME_PRIMARY,
    Phone.NUMBER
};
Making the SQLite Selection Statement
Building SQLite queries in Java can be confusing, so let's walk through this step-by-step.
- Check if either Contact.DISPLAY_NAME_PRIMARY or Phone.NUMBER start with the input text. Since the contact name and phone number are strings, we can use the LIKE operator to see if the input text matches.
private final String SELECTION = '(' + Contacts.DISPLAY_NAME_PRIMARY + " LIKE ? OR " + Phone.NUMBER + " LIKE ?) AND " +
- Compare the
Phone.TYPE column to the Phone.TYPE_MOBILE column to make sure we are only looking at mobile phone numbers.
Phone.TYPE + "='" + Phone.TYPE_MOBILE + "' AND " +
- Because there are many different types of information associated with a contact, compare the
Data.MIME_TYPE column to Phone.CONTENT_ITEM_TYPE using the equality operator to make sure we are dealing with phone number information.
Data.MIMETYPE + "='" + Phone.CONTENT_ITEM_TYPE + "'";
Instantiating the Adapter
In order to instantiate the adapter, we need to provide a valid Context, a layout resource for a single list item, and a mapping between columns and view IDs. This mapping allows the SimpleCursorAdapter to automatically display a list item for us with very little code. We can choose to provide a cursor at instantiation, but for our purposes this is unnecessary. We are using a pre-existing layout resource for simplicity.
SimpleCursorAdapter adapter = new SimpleCursorAdapter(this,
    android.R.layout.simple_list_item_2,
    null,
    new String[]{
        Contacts.DISPLAY_NAME_PRIMARY,
        Phone.NUMBER},
    new int[]{
        android.R.id.text1,
        android.R.id.text2
    },
    0
);
Set a FilterQueryProvider so the adapter knows how to get content, given text to filter with. The query is run on a background thread, so we don't have to worry about blocking the main thread.
adapter.setFilterQueryProvider(new FilterQueryProvider() {
    @Override
    public Cursor runQuery(CharSequence constraint) {
        String constraintWithWildcard = constraint + "%";
        return getContentResolver().query(
            Data.CONTENT_URI,
            PROJECTION,
            SELECTION,
            new String[]{
                    constraintWithWildcard,
                    constraintWithWildcard
            },
            Contacts.DISPLAY_NAME_PRIMARY + " DESC"
        );
    }
});
We also need to provide a CursorToStringConverter so the adapter knows how to convert a contact row into a string the AutoCompleteTextView can use to complete a user's entry.
adapter.setCursorToStringConverter(new SimpleCursorAdapter.CursorToStringConverter() {
    @Override
    public CharSequence convertToString(Cursor cursor) {
        int phoneNumberIndex = cursor.getColumnIndex(ContactsContract.CommonDataKinds.Phone.NUMBER);
        return cursor.getString(phoneNumberIndex);
    }
});
All that's left is to set the adapter on the AutoCompleteTextView itself:
mRecipient = (AutoCompleteTextView) findViewById(R.id.recipient);
mRecipient.setAdapter(adapter);
Now that we can get contact info, let's see how we can open the Venmo app and pay a contact. Let's walk through a sample method to open Venmo and make a transaction.
private void doTransaction(String recipient, String amount, String note, String txn) {
    try {
        Intent venmoIntent = VenmoLibrary.openVenmoPayment(APP_ID, APP_NAME, recipient, amount, note, txn);
        startActivityForResult(venmoIntent, 1); //1 is the requestCode we are using for Venmo. Feel free to change this to another number.
    } catch (android.content.ActivityNotFoundException e) //Venmo native app not install on device, so let's instead open a mobile web version of Venmo in a WebView
    {
        Intent venmoIntent = new Intent(MyActivity.this, VenmoWebViewActivity.class);
        String venmo_uri = VenmoLibrary.openVenmoPaymentInWebView(APP_ID, APP_NAME, recipient, amount, note, txn);
        venmoIntent.putExtra("url", venmo_uri);
        startActivityForResult(venmoIntent, VENMO_REQUEST_CODE);
    }
}
We are using an Intent, a class Android provides to launch other components, to launch the Venmo app in order to complete a transaction. Note that if the app is not installed, a WebView will be launched that uses the Venmo website to complete the transaction. To get results from the App Switch SDK, we can define onActivityResult in our Activity, like so:
@Override
protected void onActivityResult(int requestCode, int resultCode, Intent data)
{
    switch(requestCode) {
        case 1: { //1 is the requestCode we picked for Venmo earlier when we called startActivityForResult
            if(resultCode == RESULT_OK) {
                String signedrequest = data.getStringExtra("signedrequest");
                if(signedrequest != null) {
                    VenmoResponse response = (new VenmoLibrary()).validateVenmoPaymentResponse(signedrequest, app_secret);
                    if(response.getSuccess().equals("1")) {
                        //Payment successful.  Use data from response object to display a success message
                        String note = response.getNote();
                        String amount = response.getAmount();
                    }
                }
                else {
                    String error_message = data.getStringExtra("error_message");
                    //An error occurred.  Display the error_message to the user.
                }
            }
            else if(resultCode == RESULT_CANCELED) {
                //The user cancelled the payment
            }
        break;
        }
    }
}
And that's it!